I’ve been following the documentation so far, and I was wondering if there is a way (e.g., a jumper) to force the TX2 board to start/boot when the power is plugged in. Right now all it does is turn on the CVM powered LED (CR5), and then I have press the button.
Yes that is my hope too. I’m looking at the board, and can’t help but notice that the jumpers J3, J4, J6 and J9 seem almost perfectly aligned with the buttons.
Alternatively, Wake On Lan would work for me, but I’ve tested it and didn’t do anything.
Hmm, I wonder if simply a 10 uF capacitor across the power button header would do it? If they use a 10k pull-up, that’d keep it down for 10 ms; if they use more like 100k, it’d be proportionately longer.
It would short the power button for however long it takes to charge the capacitor through whatever pull-up resistor they’re using.
Add a 1 MOhm resistor across the cap too, to let it discharge when power is turned off, so it’s ready to re-trigger whenever it comes back on. (Less than 1 MOhm and you’d have to know the pull-up value used for the power button to make sure the discharge doesn’t actually keep it low.)
I should experiment with this when I get back to the board …
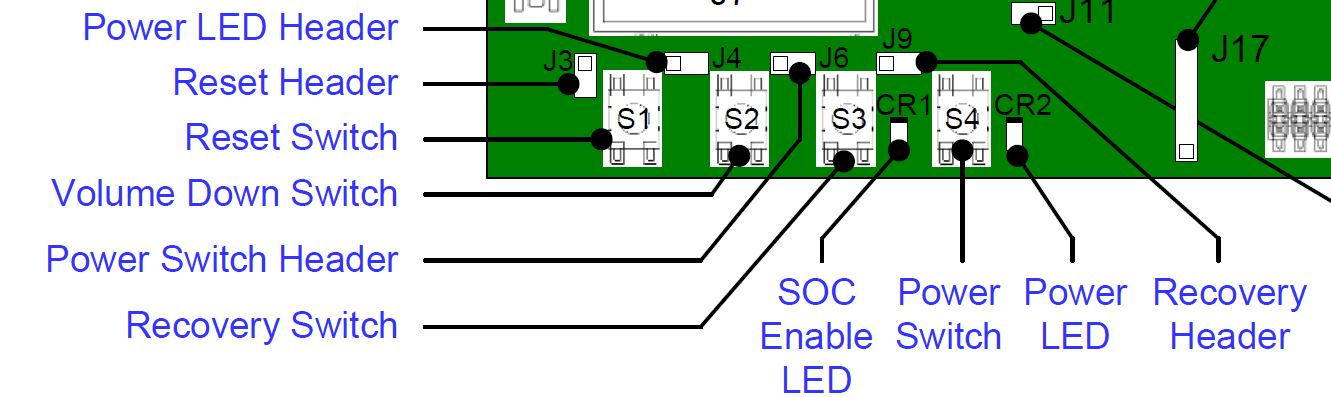
I’m experimenting with this. There is 4.75V on the power switch header (which is next to the recovery button – the header next to the power button is the recovery header.) Shorting it does turn on the board. 10 uF is not enough to turn it on automatically, though.
A capacitor short while the power is applied to the board (plugging in the barrel connector) is not sufficient to turn the board on (I tried with 100 uF.)
However, once the board has stabilized (a few seconds after the single red power LED has lit up,) a 100 uF capacitor across the power button header IS enough to turn it on.
So, a small circuit that’s powered by the 4.75V out on the power button, waits for a bit, shorts the pins, and then doesn’t repeat the trick until power has been off for seconds, would do it.
diode + capacitor + 555 in one-shot mode + timing resistor/capacitor + BS170 might do it. Seems a little too complicated compared to some pre-designed strapping option, though :-(
Using an Orbitty carrier board, I just turn the power on and it starts without any button press. I’m guessing that behavior is specific to the development board (carrier).
I’ve tried an Orbitty carrier board, and indeed it does auto-start.
Problem is that Obritty does not support USB-3.0 at the moment, which is a deal breaker for me.
Pity really, as we were going to order 10+ units, and I liked how small of a footprint it had, and its low cost.
At the moment, the only board which seems to do all of the above is Auvidea J120, from what I can tell the SDK board needs modifications, which I don’t have the know-how or expertise to do.
Hope I’m wrong about this, still waiting for a response from NVIDIA ;-)
Now, our job is to build some kind of circuit that:
detects that the power header starts providing 4.75V (meaning main power is connected)
waits half a second
shorts the power header for a short interval (100 ms?)
un-shorts the power header again
does nothing until power goes away
Note that, while shorting the power header, the 4.75V that it provides out will of course be shorted to ground, so some kind of power reservoir that doesn’t go away with the short is needed. A diode into a capacitor seems reasonable.
I don’t know how much current is available on the header. Chances are, it’s a very weak pull-up, and that’s why it measures at 4.75V – the input impedance of my multimeter might be a couple of megaohms, which puts the pull-up at perhaps 100kOhm, which means it will only give us 50 uA or so.
To build a circuit that acts as I suggested above, on 50 uA of power, you’d need a very low-power microcontroller – I don’t think a low-power 555 timer chip exists that could do it. Something like a TI MSP430 might do it.
Or you can draw power from some header with actual, real power available (like the GPIO headers,) and then just make it wait 0.5 seconds, output the short for 0.1 seconds, then stop and just do nothing until the end of time.
If you have a programmable MCU board available, that should be super simple. You could do it on an Arduino, even :-)
(Also: Why is the power switch header and recovery header swapped compared to the power switch button and the recovery button? Who knows. Maybe just to make life less consistent and thus more interesting ;-)
in my system, so I am guessing this requires to flash it again?
Patching the system by copying extlinux.conf and copying the dtb to boot seems like a much easier solution.
@Andrey1984 Thanks very much! This solved the USB-3.0 issue (Kinect v2.0 verified to be working).
Still however its not clear if the SDK board supports auto-start one way or another, or if it doesn’t.
“Patching the system by copying extlinux.conf and copying the dtb to boot seems like a much easier solution”
That method enables USB 3.0 port but it works in USB 2.0 mode.
The method which requires flash with the cfg file substitution - resolves the issue up to the state when USB 3.0 port works in USB 3.0 mode superspeed .
@Andrey1984 yes I figured it out, I was seeing the USB device, but only on 2.0.
I flashed it using the .cfg file, and then patched dtb and copied the extlinux.conf.
This has enabled USB 3.0. I am still getting a warning in dmesg, but it happens only once at boot.
Again, thanks for the help.
Let’s see now if the SDK board can be auto-started…
I don’t mind posting it, but I think its deviating from the original question:
[    1.260252] usbcore: registered new interface driver usbfs
[    1.266061] usbcore: registered new interface driver hub
[    1.271726] usbcore: registered new device driver usb
[    1.550690] vdd-usb0-5v: 5000 mV
[    1.554391] vdd-usb1-5v: 5000 mV
[    2.817855] usbcore: registered new interface driver asix
[    2.823949] usbcore: registered new interface driver ax88179_178a
[    2.830730] usbcore: registered new interface driver cdc_ether
[    2.837273] usbcore: registered new interface driver smsc95xx
[    2.843623] usbcore: registered new interface driver net1080
[    2.849851] usbcore: registered new interface driver cdc_subset
[    2.856328] usbcore: registered new interface driver zaurus
[    2.862520] usbcore: registered new interface driver cdc_ncm
[    2.869110] usbcore: registered new interface driver usb-storage
[    2.875692] usbcore: registered new interface driver usbserial
[    2.882057] usbcore: registered new interface driver ftdi_sio
[    2.888279] usbserial: USB Serial support registered for FTDI USB Serial Device
[    2.896601] usbcore: registered new interface driver option
[    2.902705] usbserial: USB Serial support registered for GSM modem (1-port)
[    2.910254] usbcore: registered new interface driver pl2303
[    2.916385] usbserial: USB Serial support registered for pl2303
[    2.923161] tegra-usb-cd usb_cd: otg phy is not available yet
[    2.931740] tegra-xudc-new 3550000.xudc: usb2 phy is not available yet
[    3.102291] usbcore: registered new interface driver gspca_zc3xx
[    3.163982] usbcore: registered new interface driver usbhid
[    3.163983] usbhid: USB HID core driver
[    3.371457] xhci-tegra 3530000.xhci: Direct firmware load for tegra18x_xusb_firmware failed with error -2
[    3.451319] vdd-usb0-5v: disabling
[    6.839140] usb usb1: New USB device found, idVendor=1d6b, idProduct=0002
[    6.847025] usb usb1: New USB device strings: Mfr=3, Product=2, SerialNumber=1
[    6.857017] usb usb1: Product: xHCI Host Controller
[    6.862912] usb usb1: Manufacturer: Linux 4.4.15-tegra xhci-hcd
[    6.872647] usb usb1: SerialNumber: 3530000.xhci
[    6.926744] usb usb2: New USB device found, idVendor=1d6b, idProduct=0003
[    6.934585] usb usb2: New USB device strings: Mfr=3, Product=2, SerialNumber=1
[    6.946515] usb usb2: Product: xHCI Host Controller
[    6.954764] usb usb2: Manufacturer: Linux 4.4.15-tegra xhci-hcd
[    6.961705] usb usb2: SerialNumber: 3530000.xhci
[   54.980540] usb 1-2: new high-speed USB device number 2 using xhci-tegra
[   55.317312] usb 2-1: new SuperSpeed USB device number 2 using xhci-tegra
[   55.342933] usb 1-2: New USB device found, idVendor=045e, idProduct=02d9
[   55.349697] usb 1-2: New USB device strings: Mfr=1, Product=2, SerialNumber=0
[   55.356984] usb 1-2: Product: NuiSensor Adaptor
[   55.362100] usb 1-2: Manufacturer: Microsoft Corporation
[   58.300580] usb 2-1: New USB device found, idVendor=045e, idProduct=02d9
[   58.307357] usb 2-1: New USB device strings: Mfr=1, Product=2, SerialNumber=0
[   58.314651] usb 2-1: Product: NuiSensor Adaptor
[   58.319772] usb 2-1: Manufacturer: Microsoft Corporation
[   58.804956] usb 2-1.1: new SuperSpeed USB device number 3 using xhci-tegra
[   58.825698] usb 2-1.1: New USB device found, idVendor=045e, idProduct=02c4
[   58.832621] usb 2-1.1: New USB device strings: Mfr=1, Product=2, SerialNumber=4
[   58.840016] usb 2-1.1: Product: Xbox NUI Sensor
[   58.844582] usb 2-1.1: Manufacturer: Microsoft
[   58.849172] usb 2-1.1: SerialNumber: 001680660547
[   59.001276] usbcore: registered new interface driver snd-usb-audio
[  152.768833] usb 2-1.1: reset SuperSpeed USB device number 3 using xhci-tegra